| 1. To begin, gather the tools you will need. You will need safety glasses, a tape measure, a screwdriver, an open-end wrench, a pipe wrench, a set of allen wrenches, a hacksaw (optional), at least one winding bar, a file (optional), a rag, a permanent marker, two quarters, needle-nose pliers, and oil can. To wind the new torsion spring, you will need a power drill with a socket extension and sockets. You will also need a sturdy ladder. | 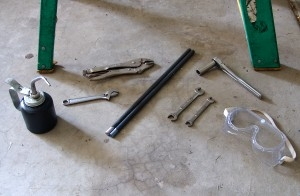 |
 | 2. Unplug the power cord to the garage door opener. Some older openers are hardwired, and you will need to remove a fuse or flip the circuit breaker. |
| 3. Disengage the opener from the door. Some door openers have a neutral position for the trolley disconnect. On older openers, you may need to remove the L-shaped drawbar arm. |  |
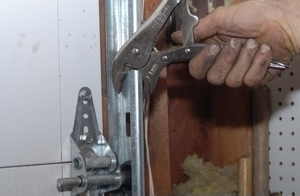
 | 4. Vise grip the vertical track about 3" above one of the rollers. If you install the wrong springs, or if you over-wind the spring, this will prevent the garage door from flying up and knocking you off your ladder after winding the spring. This has happened to me on more than one occasion. |
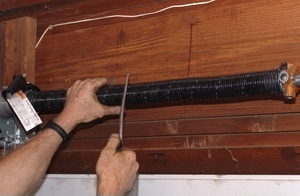
| 5. Measure your broken spring and your new spring to make sure you have the correct springs. When you find the 20-coil measurement and length, you will need to compress the spring to remove the gaps between the coils of the springs. | 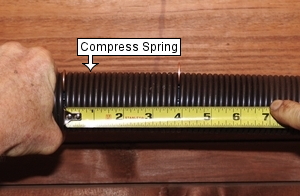 |
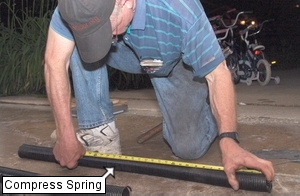 | 6. Lay the new spring on the garage floor or workbench and measure the length, inside diameter, and 20 coils to determine the wire size. Again, you will need to compress the spring to remove the gaps between the coils. Check the wind on both your broken spring and your new spring to ensure that they are the same. |
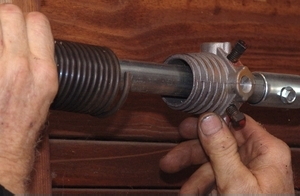
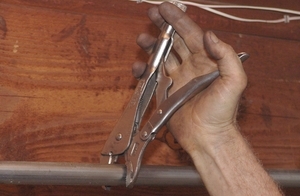
| 7. If the last coil on both ends of the new torsion spring is not raised, you will need to bend it. Arrange two vise grips and a screwdriver, as shown. The bottom vise grip will stay stationary as you hold it down with the screwdriver. Grip the end of the last coil with the second vise grip. | 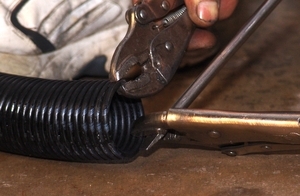 |
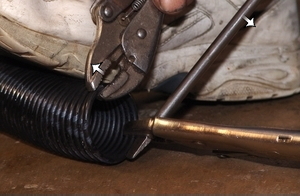 | 8. Push down on the screwdriver and pull the last coil away from the spring. The last coil should be raised approximately 1/4". Bend the last coil on the other end of the spring as well. |
| 9. Re-install the cables in the bottom bracket if necessary. | 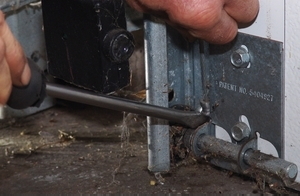 |
 | 10. Loosen the setscrews on the stationary cone of the broken spring. Caution: Never loosen setscrews on a wound torsion spring without the proper tools. This type of cone is typically called the winding cone. Due to the design of EZ-SET torsion springs, this cone is used as a stationary cone for the garage door. If you have a traditional torsion spring, you will have this cone as the winding cone as well as a different cone for the stationary cone. |
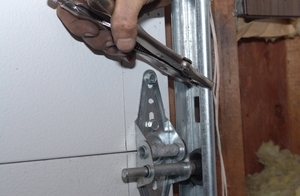
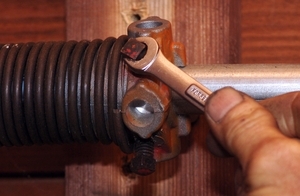
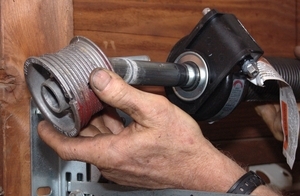
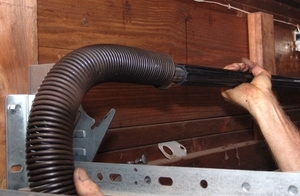
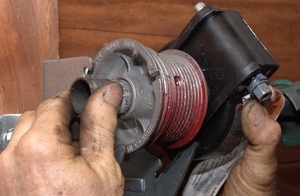
| 11. You are now ready to remove the stationary cone from your broken EZ-SET spring. Grip the end of the spring coil with a pipe wrench, as shown. | 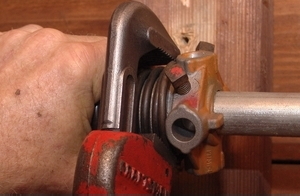 |
 | 12. Insert a winding bar into the stationary cone. |
| 13. Push up on the winding bar. This will loosen the stationary cone from your old torsion spring. | 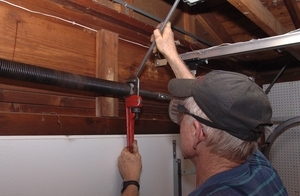 |
 | 14. Repeat the previous two steps until the stationary cone comes off the spring. Make sure your pipe wrench is gripping the last coil while you raise the winding bar. |
| 15. Move to the end of your garage door where the EZ-SET spring is secured. | 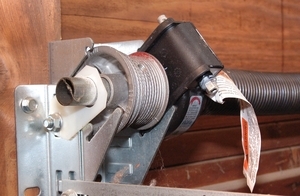 |
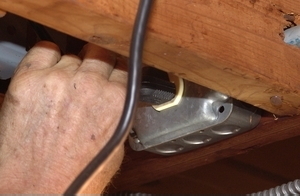
 | 16. Remove the bolt securing the shaft retainer. |
| 17. Remove the shaft retainer. | 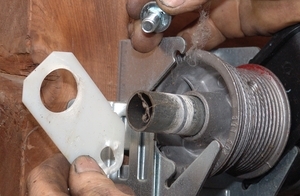 |
 | 18. Using an Allen Wrench, loosen the two set screws on the cable drum. You will need to turn the Allen Wrench in the counter-clockwise direction. |
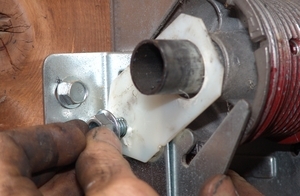
| 19. Using a hammer, long screwdriver, or bar, pry the shaft and hardware out of the end bracket. | 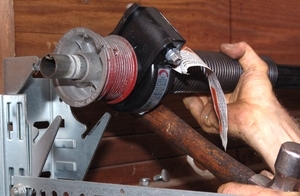 |
 | 20. Slide the cable drum off the shaft. |
| 21. Slide the broken spring with the winder off the shaft. You will remove the winding unit from the spring later. | 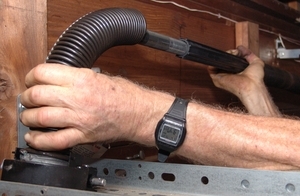 |
 | 22. Slide the remainder of the broken spring off the shaft. Caution: Make sure you throw away your old spring. My worst ladder accident occurred when I stepped on a spring and twisted my ankle. |
| 23. Leave the spring spacer and stationary cone on the shaft. | 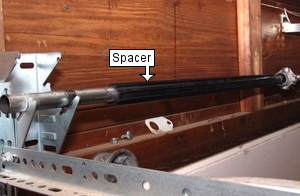 |
 | 24. If your new spring is shorter than your old spring, you will need to shorten the spacer. Measure this distance along the spacer and make a mark with a hacksaw. |
| 25. Slide the spacer slightly off the end of the shaft. You need to cut through the spacer without cutting the shaft. |  |
 | 26. Slide the spacer back on the shaft. |
| 27. You are now going to remove the winding unit from the broken spring. Take this part to either the garage floor or a workbench. (If you have access to a vise, you can use alternate instructions here.) Insert the head of a flathead screwdriver into the slot on the winding unit. | 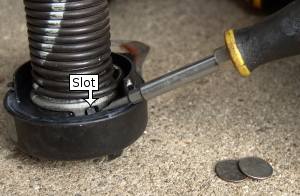 |
 | 28. Suppress the tab with the screwdriver. This will release half of the winding cone from the winding unit. |
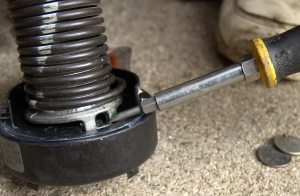
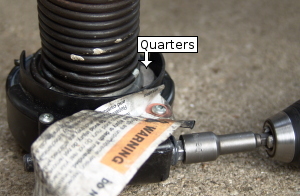
| 29. Insert two quarters between the winding cone and the winding unit, as shown. | 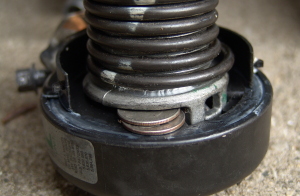 |
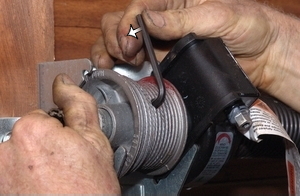
 | 30. Insert your drill with a socket extension on the winding bolt. Wind the winding unit, so the quarters pass inside the lip of the winding unit, as shown. |
| 31. Continue winding until the other tab passes outside of the lip, as shown. | 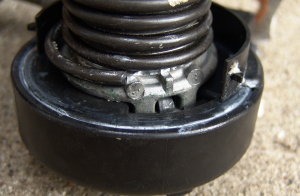 |
 | 32. Suppress the second tab with a screwdriver. |
| 33. Remove the spring from the winding unit. | 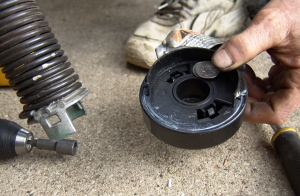 |
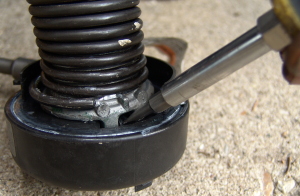
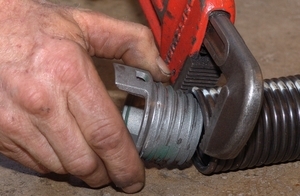
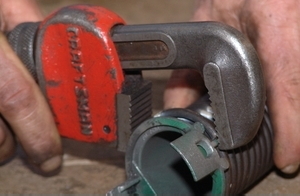 | 34. You are now ready to remove the winding cone from the old spring. Grip the end of the last coil on the spring with a pipe wrench. |
| 35. Place a winding bar or long screwdriver between the teeth of the winding cone, as shown. Twist the winding plug out of the spring by pushing the winding bar away from the pipe wrench. | 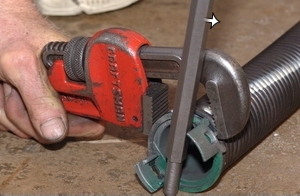 |
 | 36. After several turns, remove the winding cone from the old EZ-SET torsion spring. |
| 37. Wipe off any grease that is on the winding cone. | 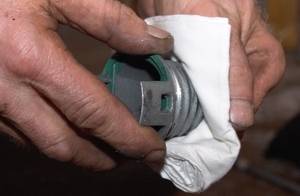 |
 | 38. Slide the new torsion spring on the shaft over the spacer. |
| 39. Slide the winding cone on the shaft. | 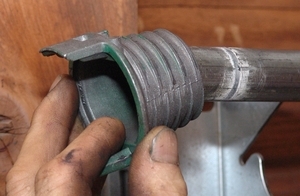 |
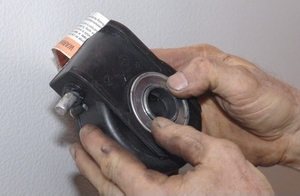 | 40. Inspect the bearing on the winding unit. It may need to be oiled. If it is damaged, replace the bearing. |
| 41. Inspect the shaft by the end bracket where the cable drum was. If the garage door installer over-tightened the set screws on the cable drum, you might need to file the shaft. |  |
 | 42. Slide the winding unit on the shaft. |
| 43. Slide the cable drum on the shaft. | 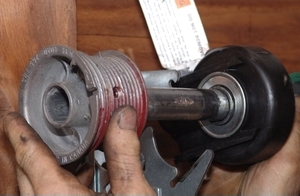 |
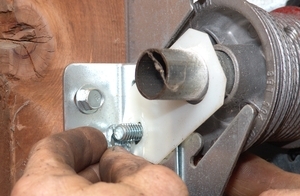
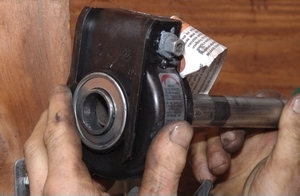
 | 44. Slide the winding unit along with the shaft and other hardware into the end bracket. The winding unit has a slot that fits over the rail on the bracket. The cable drum needs to be contained by the bracket as well. |
| 45. Make sure the bolt on the winder points toward the garage floor. | 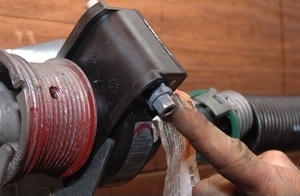 |
 | 46. Reinstall the shaft retainer. Secure it with a carriage bolt and flange nut. Caution: Do not over-tighten the bolt. Doing so can cause the shaft retainer to break. |
| 47. Slide the winding cone into the winding unit. Pull lightly on the cone to make sure it is secure. | 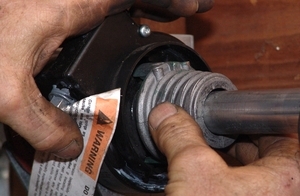 |
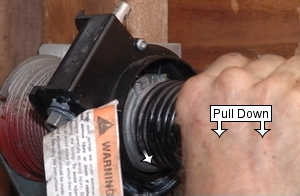 | 48. Pull down on the new torsion spring to install it on the winding cone. |
| 49. Once you can no longer secure the spring by hand, grip the 4th, 5th, and 6th coils from the end with a pipe wrench. Pull down to tighten the spring. | 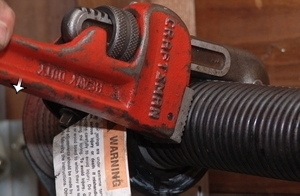 |
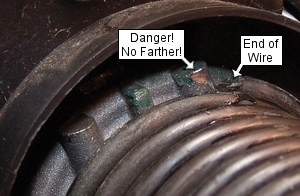 | 50. Stop tightening the spring on the winding cone once the end of the coil reaches the stopping point on the cone. |
| 51. Move to the stationary cone. Twist the spring up while twisting the cone down to install the stationary cone. | 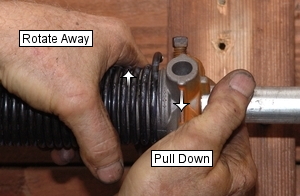 |
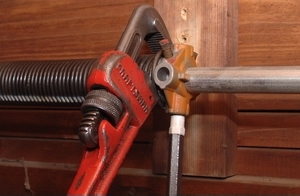
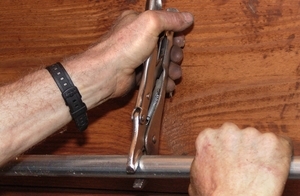
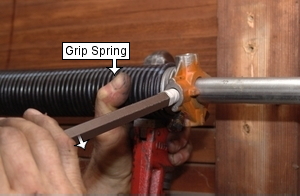 | 52. Insert the 4th, 5th, and 6th coils from the end of the spring into the jaw of the pipe wrench. Grip the spring and pipe wrench with your left hand, as shown. Insert a winding bar in the stationary cone. Without letting the spring move in the jaw of the pipe wrench, pull down on the winding bar. |
| 53. Release your grip on the spring. Move the winding bar up while allowing the coils in the jaw of the pipe wrench to turn. Continue winding the plug until there are no more grooves on the cone for the spring. The cones are now installed on the spring. | 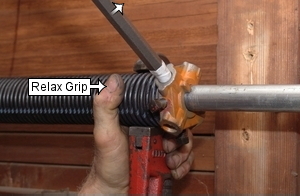 |
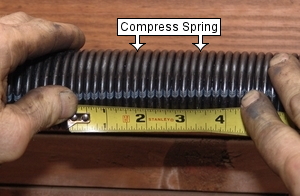 | 54. Compress a section of spring and measure the length of 11 coils. |
| 55. Compress the whole spring from the stationary cone. Mark the shaft with a permanent marker or file the distance of 11 coils away from the cone, as shown. |  |
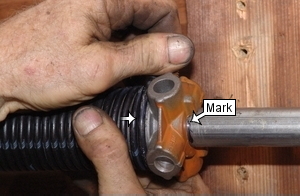 | 56. Bring the stationary cone to the mark and finger-tighten the set screws. Specially gapped aftermarket springs should not need to be stretched. Do not use standard torsion springs. |
| 57. Tighten both set screws 1/2 to 3/4 turns each after each screw first meets the shaft. This is the point at which you will feel the screw meeting resistance. | 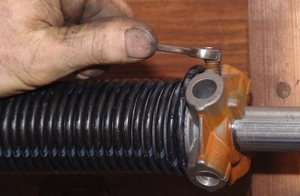 |
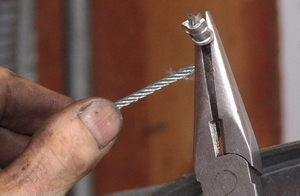 | 58. Move to the right side of the garage door. A common problem for do-it-yourselfers and inexperienced garage door repairmen is getting the end of the cable to properly seat in the slot of the cable drum. Bend the cable at a 90-degree angle with needle-nose pliers as shown. |
| 59. Bending the cable will help you avoid problems with the tip at the end of the cable catching on the end bracket and causing the cable to come off and the garage door to jam, cock, or fall. Check to make sure the cable is straight in the slot and not sticking out the side. Also, the edge of the cable stop should not be pointing to the side. The cable tip should fit completely inside the drum, with the rounded part facing out so the tip can't scrape the end bracket. | 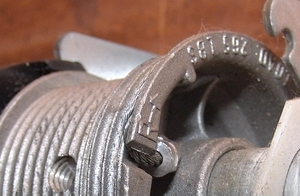 |
 | 60. Slide the shaft toward the middle of the garage door until the cable drum is flush against the race of the bearing. |
| 61. Pull down on the cable drum to tighten the cable around the drum. | 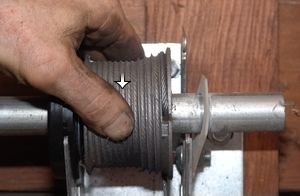 |
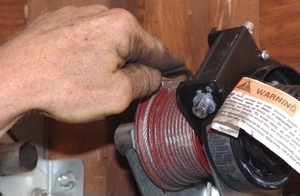
 | 62. While twisting the shaft down to keep the cable secure, vise grip the shaft as shown. The top of the vise grip should be tight against the garage header. This will keep the cable on the first drum while you install the cable on the other drum and position it in place. |
| 63. Move to the other side of the garage door. Bend the cable at a 90-degree angle. Insert the cable into the drum. | 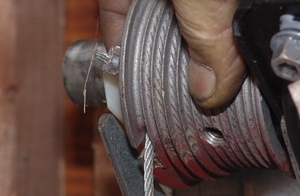 |
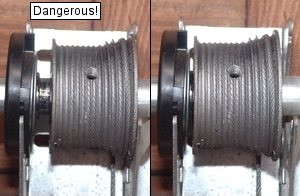
 | 64. Slide the drum against the race of the bearing. Not doing this could cause the cables to come off the drum and the door to fall, damaging the door and possibly causing injury. |
| 65. Pull down on the cable drum to wrap the cable around the drum. The cable must be tight coming off of the drum. | 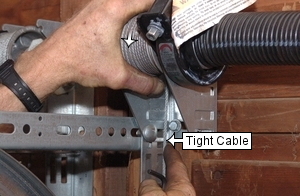 |
 | 66. Tighten the set screws on the cable drum. |
| 67. If you cannot tighten one of the set screws right now, you can tighten it later. | 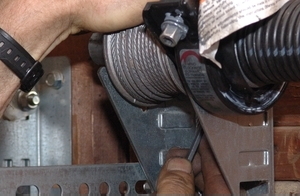 |
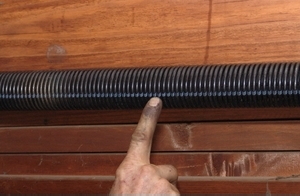 | 68. Examine the torsion spring. If there is not already a line across the length of the spring, spray paint a stripe yourself. |
| 69. It is now time to wind your spring. To do this, you will need a drill and a 7/16 inch nut driver or a 1/4 inch straight hex allen wrench. Examine the paint stripe next to the winding unit. As you start winding the spring, this stripe will start moving down. If it moves up, you are winding the spring in the wrong direction. | 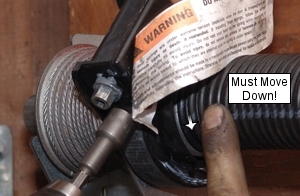 |
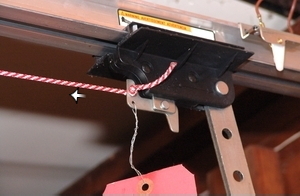
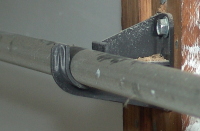 Replacement directions are identical for single-car and double-car garage doors with the EZ-Set Torsion Spring System with only one spring on the left side. The only difference is that the center shaft coupler (or the center of the shaft, if there is no coupler) is supported in the middle on double-car doors. (See image on right.) If your door has two springs, you will first need to unwind the unbroken spring and vary some of the procedures. Please contact us if you have any questions regarding this.
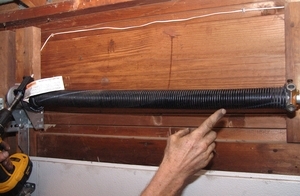

0 Response to "Easy Torsion Spring Replacement Without Winding Springs"
Post a Comment